Before You Begin
Before you begin integrating Paysafe's Checkout solution, you need to set up a merchant account to facilitate payment processing and manage your financial transactions. You should also understand some concepts that are important when processing payments with Checkout - payment handles and how senstive customer information is saved and retrieved.
Get API Keys
To get started with Checkout:
-
Contact our Integrations team to get your Business Portal account access and help setting up.
When you have access to the Business Portal, you can use it to manage all of your accounts and API keys.
You need two API keys:- Public key for browser-to-Paysafe communications.
- Private key for server-to-server calls.
As the public key is accessible through the browser, it can be compromised, so you need the private key to keep important server-to-server communications secure.
-
In the Business Portal, go to Integrate > API Keys.
-
For the public key, click Copy to copy the key.
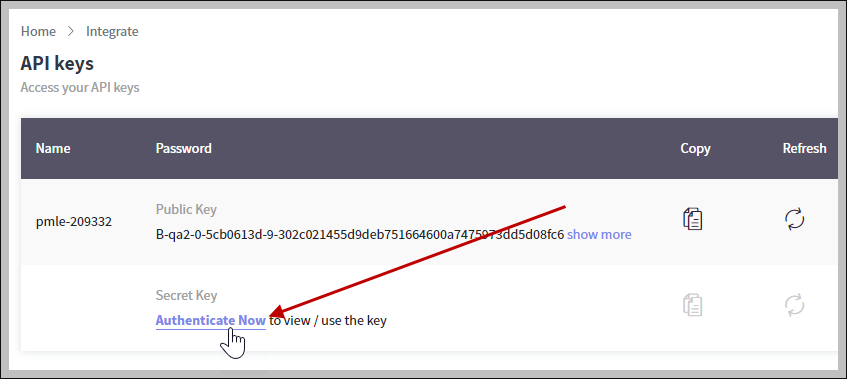
-
For the private key (secret key), click Authenticate Now and enter your Business portal password to view the key.
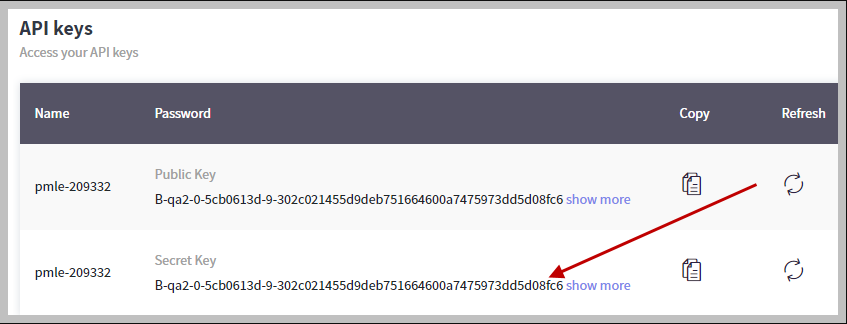
-
Your API key has the following format:
- Key Username – MerchantXYZ
- Key Password – B-tst1-0-34bcea45db-3123f9bb4020a89e8ac44cdfdcec
NOTE: The key is case-sensitive.
For server-to-server calls, the API key is sent using HTTP Basic Authentication.
To use HTTP Basic Authentication, you must send the API key credentials using an Authorization header with every request.Construct the Authorization header as follows:
-
Combine the Key Username and Key Password into a string separated by a colon, e.g. “Key Username:Key Password”.
-
Encode the resulting string literal using base64.
-
Place the word "Basic" followed by a space and your base64-encoded username:password string to form the header:
Authorization: Basic TWVyY2hhbnRYWVo6Qi10c3QxLTAtNTFlZDM5ZTQtMz
curl --location 'https://hosted.test.paysafe.paysafe.com:443/paymenthub/v1/singleusepaymenthandles' \

--header 'Content-Type: application/json' \

--header 'Accept: application/json' \

--header 'Authorization: Basic c3V0LTM0ODg2MDpCLXFhMi0wLTVkM2VjYjMwLTEtMzAyYzAyMTQyYTM3NjgxMmE2YzJhYzRlNmQxMjI4NTYwNGMwNDAwNGU2NWI1YzI4MDIxNDU1N2EyNGFiNTcxZTJhOWU2MDVlNWQzMjk3MjZjMmIzZWNjNjJkNWY=' \ -
When you've received your API Keys you can load the SDK and start processing payments.
Your production API key will be different to your test API key. To get your production API Key details, log in to the Business Portal.
You must keep your API keys safe and ensure that they are used appropriately for your needs - do not store your API key as part of your code.
For any queries, contact the Integrations team.
Tokenization - Payment Handles
A paymentHandle is a tokenized variable that allows you and your customers to safely transact without exposing critical information to unauthorized entities.
Important transactions are two step processes:
- Tokenize all important information into a paymentHandle.
- Use the paymentHandle over server-to-server calls to securely complete transactions.
The tokenized information could be anything, including card information, banking information, identity documents, customer profiles, usernames for APMs, saved cards, saved addresses and so on.
Payment handles overview

Save Customers
It's useful to allow returning and recurring customers to save their cards, addresses and profile information for future use. To store customer information at your end however, you as a merchant would need to be PCI compliant.
To reduce your PCI burden, Checkout can securely store all such information on your behalf using Customer Tokens.
Saving customer data involves two levels of consent:
- You want to save the information.
- The customer must give consent to save the information.
Customer information overview

First transaction
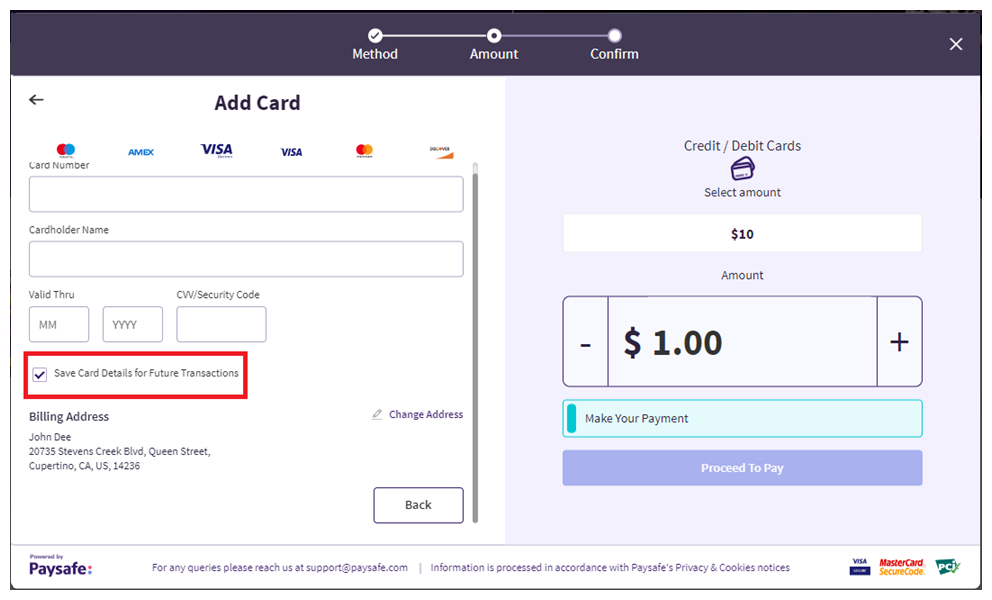
- The customer selects the option to save their details (card, bank account, addresses) while making a payment in Checkout:
- The customerOperation parameter returned in the resultCallback is set to ADD.
- If you opted for webhooks, the endpoint receives a webhook with the same information.
NOTE: Checkout displays the save option to customers by default but, if required, you can make it compulsory for customers to save their card details when making a payment.
- As customerOperation is set to ADD, you must include the merchantCustomerId parameter along with the rest of the request payload when you trigger the Payments API.
- We create a profile of the customer and send you a response containing a Paysafe generated customerId and a multiUsePaymentHandleToken which stores the tokenized information of the payment instrument.
- If you opted for webhooks, the endpoint receives a webhook with the same information.
- Store the customerId for future transactions.
Alternatively, you can use the merchantCustomerId to call the Payments API and retrieve the customer profile as needed - see Get Customer Using Merchant Customer Id.
First transaction flow diagram

resultCallback: Result object example
{

    "paymentHandleToken": "SCRDHTFt3Jwrqz9m",

    "paymentMethod": "CARD",

    "customerOperation": "ADD",

    "amount": 1000,

    "transactionType": "PAYMENT"

}
Payment request example
{

    ...

    "merchantCustomerId": "user001",

    ...

}
Payment response example
{

    ...

    "multiUsePaymentHandleToken": "C9UBW2vnGAlSsYO",

    "customerId": "770e94cd-9d33-4aff-9f9c-b94d7e9ffa8f",

    ...

}
Subsequent transactions
- Before initiating the Checkout SDK, trigger an API call to generate a singleUseCustomerToken using the Customer Tokens API:
POST: /paymenthub/v1/customers/{customerId}/singleusecustomertokens - We send a response containing the token along with other information.
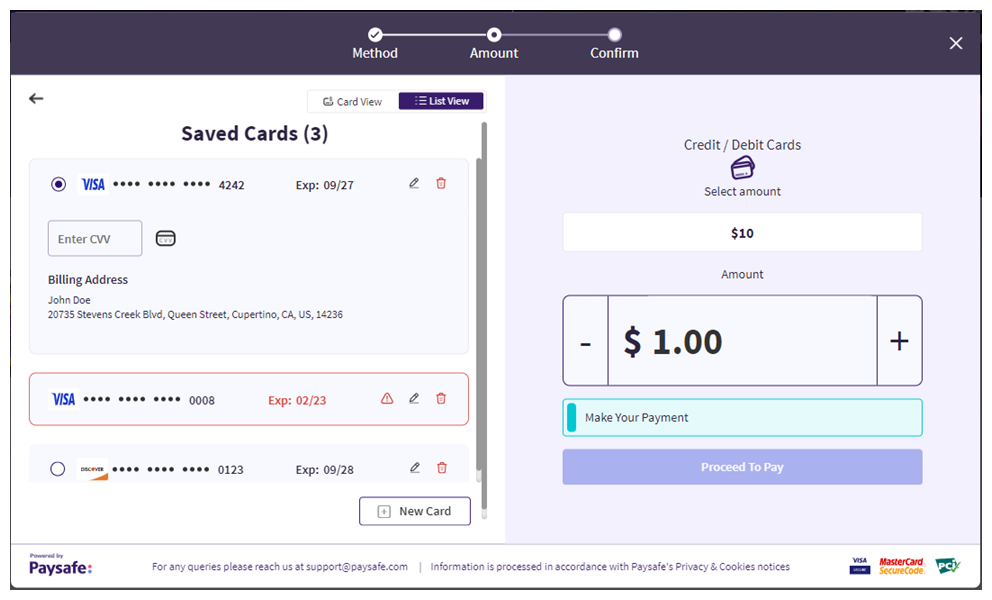
- Pass the token to the Checkout SDK - all tokenized information such as addresses and payment details that have previously been saved for the customer are displayed in the Checkout.
- After generating the token there is no need to monitor the customer's actions (unlike a first-time customer transaction). The Checkout handles the customer's save/ delete/ edit actions on its own, and you don't have to pass merchantCustomerId in the Payments API call.
- The token remains active for 900 seconds and can be used for multiple sessions for the same customer.
Subsequent transaction flow diagram

Checkout SDK example with singleUseCustomerToken
<html>

    <head>

        <script src="https://hosted.paysafe.com/checkout/v2/paysafe.checkout.min.js"></script>

    </head>


    <body>

        <button onclick="checkout()"> Pay $25 </button>

    </body>


    <script>

        function checkout() {

            paysafe.checkout.setup("API Key", {

                "currency": "USD",

                "amount": 10000,

                "singleUseCustomerToken": "SPFAB1cA5iwdu48H",

                "locale": "en_US",

                ...

                }

        }

    </script>

</html>